I've been working on some of my Wiltshire photos the past couple of days. Most of them are tricky to sharpen, containing a mixture of fine detail, smooth skies and wood and foliage. I always find these kind of natural subjects difficult to sharpen satisfactorily, often resorting to a combination masks, noise reduction, sharpening and artefact removal.
For small prints and computer display, there isn't usually much problem but if I want to go up to larger prints then there are definite problems. Large expanses of sky can also be problematic.
As I had some time, and wanted to do some other evaluations, I decided to try 3 main methods head-to-head. I've been using Lightzone's Noise reduction & Sharpen tools, Photoshop USM together with Neat Image noise reduction and Picture Window Pro Advanced Sharpen. This last is part of an evaluation of PWP as a potential Photoshop replacement for specific tasks.
What do I want from sharpening?
First, an explanation of what I am searching for here. Obviously I want to sharpen images to ensure that the presented image (either in print or on screen) has crisp in-focus detail and doesn't look all muddy. that's just the basic reason images get sharpened. The tool needs to find the detail edges but miss out any noise or pixel speckling.
However, my ideal sharpening has 2 attributes - a visible improvement in the image at print/display size and yet still looks correct, without artefacts and spots when viewed on-screen at 100%. that may seem like pixel peeing but I find that such a result provides the best print results and enable more latitude for enlargement or compression. While it is generally recommended that enlargements are done for sharpening, I find that, in some cases, better enlargements can be done after ideal sharpening as the spots & edge artefacts are eliminated.
I'm also looking for a tool that is fast and easy to optimise (i.e. tweak for each image). It's all very well having a general preference but many images need their own settings and I want to get to that fast.
How did I do the tests?
I've kept this fair through-out, testing just the sharpening. I used a small section of the shot above which displays all of the elements of a tricky image.
First I converted the RAW using CaptureOne LE - no sharpening or noise reduction. Of the converters I have, C1 gives results with the least problems of noise, spots, speckling etc. I cropped a small area to work with.
The resultant 16-bit TIFF was then sharpened with the respective software. First was a contrast sharpening USM ART (amount, radius, threshold) of 20,50,0. This sort of contrast sharpening gets applied to nearly all images. Then I used the various sharpening tools.
For each output I was looking for the maximum sharpening possible without degrading the image with grain, spots, edge artefacts or detail loss. I tried with and without various noise reduction techniques in each case to see if I could reduce artefact problems. Noise reduction applied after sharpening - I want to remove only sharpening artefacts and this is easier once they've been enhanced by sharpening. This kind of NR before sharpening destroys too much detail.
Below are the results, click each to get the 100% views.
Take care in viewing these images: some things are visible in the original TIFFs that may be lost in the JPEG conversion. All JPEGs converted in Photoshop from the output sharpened TIFFs at quality 9.
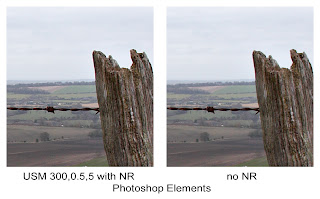
Photoshop Elements
 I've only used USM here. I have a couple of plug-ins but they only work on 8-bit images.
USM ART 300,0.5,5 was applied. this gave best overall visual results after some tweaking. Noise reduction using Neat Image and then Dust & Scratches (RT 1,40). the USM has left some speckling across the fields and the sky. Noise reduction has reduced the effect but also appears slightly softer.
Applying NR takes quite a bit of time - Neat Image has the control but thus needs more time for optimal results.
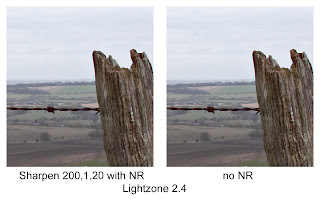
Lightzone 2.4
 My everyday editing tool.
I used the Sharpen tool at ART 200,1,20. It works slightly differently than PSE, so different settings are required.
Lots of speckling introduced, especially in the sky - while I could mask it out, it isn't always practical and becomes hard to avoid a smooth/speckly interface zone.. Noise reduction helps but removes some detail too. I find Lightzone 2.4 OK for smaller prints and web display but not so good for larger stuff or finely detailed images.
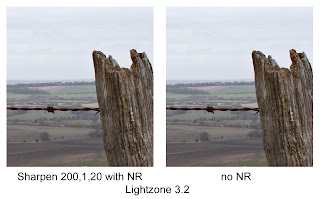
Lightzone 3.2
 This is the current version which I use for specific images (especially for shadow recovery).
As to sharpening, gain ART 200,1,20 but this time using a luminance mask (the Zone masking built in to the Sharpen tool). This way I could mask out the sky and the dark areas, especially on the fence post but keep the edges. A much better result than 2.4, far fewer artefacts. NR was then applied to just the fields in the lower left corner. Very good overall result, I think.
In both versions of Lightzone I use the Difference blend mode to control the masking.
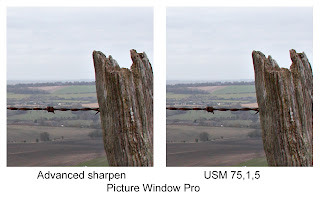
Picture Window Pro 4
 Current version and under evaluation by me.
I tried 2 sharpening methods - USM and the Advanced Sharpening. USM has much different range than PSE or Lightzone, here I use ART 75%,1,5. Very nice results, far better, I think, than PSE or Lightzone. Don't really need noise reduction.
For the Advanced Sharpen there are 3 parts to the tool. Noise reduction is a subtle grain removal tool (from what I can tell), I actually didn't use any here. There is then a Speck removal tool which takes out small speckles that might get sharpened otherwise (I would normally remove these after sharpening, here it is before). I use a very slight amount, reducing both light and dark specks.
Last is the sharpening but with very different controls. It has a sort of luminance masking similar to Lightzone 3.2 but also is far more effective at finding the edges (there is a mask preview available). There are then radius and amount sliders - I use R,A 1, 120%. The result I present here is somewhat over-sharpened but shows that PWP can go further in sharpening, leave detail intact and still not introduce extra problems. It is also fast and easy to use at this level of optimisation. Given that I've only been using it 2 days, I'm getting better results that PSE or Lightzone in a similar amount of time. I'd expect to get faster with practice.
I also like the level of control given and the ability to see the masking for each of the 3 steps of advanced sharpening.
With these results, it's almost worth buying PWP for the sharpening capabilities alone. Very impressive.


Aha, a fellow cyclist! have you thought about using Photokit? It really is excellent.
ReplyDeleteColin, I took a look at Photokit Sharpener on your suggestion, here's my take:
ReplyDeleteFirst up it's a full PS plug-in so no good for me (I don't and won't own a full copy of Photoshop). Second it's pretty expensive for a single-function plug-in. For all that it better be real good.
So I read the manual and looked through the examples to see if I'd otherwise be interested. I don't think so. It is way too black-box for me. while they advertise the "full control" actually all you get are a large number of presets. I don't see anything that lets the user know exactly where and how much the tool is applying. Of course you could a apply masks to look at the differences but that is after the fact.
The other major drawback (and what I was specifically looking at here) is that it still introduces artefacts - at least they are up-front about it. I suppose the fact that they have a 3-stage (fiddly) process means that enlargement would precede output sharpening, overcoming some of that particular problem.
All-in-all not for me, and judging by the results I still think PWP advanced sharpening trumps it and PWP as a total package is cheaper, too.
This may interest you, "Real World Sharpening with Adobe Photoshop CS2" by Bruce Fraser, I am most of the way through reading it, £13 from Amazon and it is not really Photoshop specific. It explains the reasoning behind multipass (3 stage) sharpening and Photokit. Very, very good! It also explains how to do all the steps that the "black box" actions do but manually and why some aspects of sharpening cannot be judged on the monitor alone. These methods are completely non destructive and you can subtract and add to the effects as you please. The only overhead is file size. Fraser makes a strong argument that you cannot optimise sharpening in a single pass. I am only an amateur but my prints have never looked so good since I adopted the approach!
ReplyDelete