Lloyd Chambers has posted on his disappointment with some recent pano work. He even goes as far to say that he should be following his own advice (always a good thing to do). It brought up an issue that I've been to and fro with for a while: panoramic devices.
As I shoot a lot of panoramas, I thought I'd share my techniques and thoughts on the matter (with a few examples).
Background
Typically I shoot 5-6 frame, single row images. The widest I've shot is a 27 image loadsa-megapixels image that hangs over my computer (reduced in size to 6 feet wide). I shoot both handheld and from a tripod and have recently been doing HDR panos using bracketing techniques.
The issues, a summary
There are a few key, and related, issues around shooting panoramas. The number 1 is avoiding parallax errors. The technically correct way to do his is using a nodal device to rotate around the lens's nodal point (for an explanation of nodal points go Google it). The next key thing is about covering enough angle of view - when you stitch images there are losses around the edges for the image distortion. Then there is colour & exposure variation between frames which needs to be kept constant (or close to).
For most of my work, I break all of the accepted wisdom and still get great results. I'll explain how and why. First off, parallax is only really a major concern if there are objects close to the camera giving a large angle of view offset between near and far and there is a large angle of view change between successive frames. If you're shooting things far away, parallax becomes a minor (correctable) problem and if you do a lot of overlap the shift diminishes (again correctable). Colour & exposure variation can actually be corrected with RAW processing & smoothed in stitching. More on that later.
My shooting techniques
Here, then, are the things I do to get the base images for stitching:
Handheld: conventional theory says you can't do panoramas effectively handheld. No nodal point rotation so variations in vertical and horizontal. If, however, one sticks to the notion of minor angle of view changes between images and keep the distance to subject large enough, this can all be fixed. I might do as much as 75% overlap on handheld images, certainly more than for tripod work. I get very good results even with subjects as close as 10m.
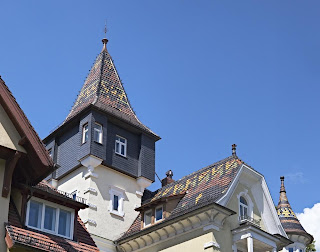
 Heidelberg roof, July 2007
4030x3174 pixels, 3 images, single row, handheld:
shot from across the street (maybe 15m away)
has a significant shift applied in the alignment due to the upward angle of view
Tripod: for tripod work I overlap a little less and work with panning horizontally. that doesn't necessarily mean keeping the camera level, which isn't possible for multi-row work anyway. Again, more overlap for closer subjects. I always use a remote release and mirror lock-up. I allow at least 5s after mirror up before firing the shutter to minimise camera vibration. that holds just as well for any tripod work, not just panoramas.
HDR brackets: I've started doing multi-exposure HDR panos. For this I have a programmed release which fires the mirror lock-up then the shutter at 5s intervals for 3 exposures for each camera position. I usually use +/-1 stop brackets with the longest exposure putting the shadows mid-histogram.
Close-up: If there is anything close, lots of overlap. Anything closer than 5m will cause problems, even with great software. I avoid that stuff unless the whole subject is close, then lots of overlap and always with a tripod.
Processing
RAW conversion: the aim of my RAW conversion is to balance colour & exposure and also remove significant distortion (although the latter is really a post-conversion step). My target is a colour values change of less that 10% in the overlap zone in adjacent frames. I typically add a little sharpening to the conversion, too: helps with fine tuning the alignment.
Typically I use CaptureOne for the conversion, especially if there is little distortion or exposure difference between shots. the I will apply equal settings to all the frames. Sometimes i use ACR followed by PTLens in Photoshop to correct distortions. Stitching is easier if basic lens distortion is fixed first, even if your stitcher uses lens distortion data.
If I've done HDR, I'll do the combination and tone mapping (with identical settings for each frame) using Photomatix Pro from the 16-bit TIFFs.
Alignment: my stitching is all done with PTGui from 16-bit TIFFs. I don't think any other program comes close in power to this. I tweak the alignment, stitch type (rectangular, cylindrical etc), angle of view, shift etc. Sometimes I have to run the optimiser carefully going through a sequence of steps to close down max error below 10 pixels. I won't go into all the details as it is a very powerful program. 90% of panoramas need nothing more than the auto settings, however.
Blending: always with the Smartblend plug-in. Nothing else comes close. It fixes colour/lum shifts, parallax & various artifacts between images (it has even removed extraneous people from some). I have not yet, with decent original alignment, seem any sign of the stitch points using Smartblend, and that's at the pixel level.
Output: always to max size, 16-bit TIFF.
Final adjustment: Once it's stitched, its off to the regular processing software for final adjustments (crop, contrast, curves, B&W, sharpening etc etc). I'll also do a resize for the output print size which is usually a shrink.
Overall it takes about 10-20 minutes to get to the stage of producing the output. A few minutes for PTGui to work the output magic, then final adjustments. Not a long process at all.
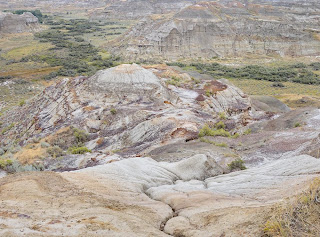
 Dinosaur valley, Alberta, August 2007
3887x2882 pixels, 4 frames, 2 rows, HDR: total 12 shots, tripod mounted
looking down so again a significant shift applied in alignment
this produces a very finely detailed 24" print (scaled-up)
Outcomes, conclusions
Pixel level examination: with this total workflow (capture to output) I'm getting prints that can be examined in fine detail, close-up with no signs that a stitch has been done, whether handheld or tripod mounted and without the nodal device.
Simplify the process: overall, Ive worked to streamline this workflow and minimise the kit I need to carry. The output is very good if I take a little care with the initial shooting.


No comments:
Post a Comment
I like comments, especially constructive ones.
Comments get emailed directly to me before publishing , so if you want to get in touch drop a comment.
All comments moderated by me before being published, keeps the spam at bay.