As I mentioned before, I intend to write some posts on editing techniques in Lightzone. Not really tutorial, more handy hints and things I've picked up along the way. I hope it will be useful to users of other editing tools who may be considering Lightzone.
As a start I thought I'd start with the central tool in Lightzone, the ZoneMapper. I came the the realization that without an introductory post like this, any other post would be excessively long. This is a mixture of an introduction of those new to Lightzone but more specifically a comparison with curves from other tools (I've used Picture Window Pro) about achieving the main results.
getting to grips with the ZoneMapper is IMO essential to getting the most out of Lightzone. It'll also be at the heart of many of my other posts in this series, and I'll refer back to this one when I do.
So to start with basics.
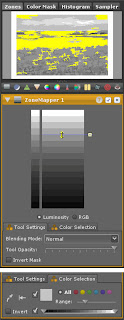
Anatomy of the tool
First to show what the elements are. At the top of Lightzone's tool stack is the sample window. It can show the ZoneFinder, a Colour Mask (more of which below), a histogram or a cursor sampler. Each of the first 3 gives data on what is currently visible in the edit window. The yellow highlight in the ZoneFinder pops up when the cursor is hovered over a zone boundary. This shows the areas in the Zone immediately above the boundary.
It is important to note at this point how the ZoneMapper works at a pixel level. While the ZoneFinder shows whole areas in a given zone, this is a broad average, the ZoneMapper actually affects all pixels at a given pixel value. The extreme would be a series of dark and light stripes. While the ZoneFinder might show a mid-range zone, the actual pixels are a high end and a low end. The ZoneMapper will treat them at the pixel level as high value and low value, not their zone average.
Below the main zone selector are 2 tabs, one for the normal blending options, the other for colour masking (see below).
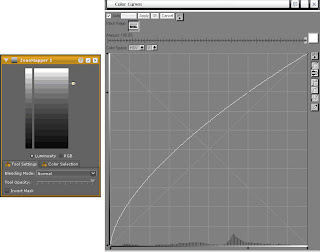 Moving a zone all the way to the top is the same a curve locked to the top edge or input values in a levels tool.
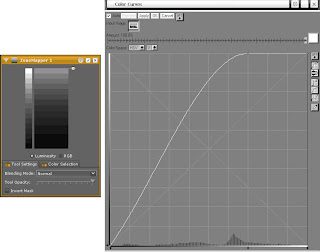 The white point
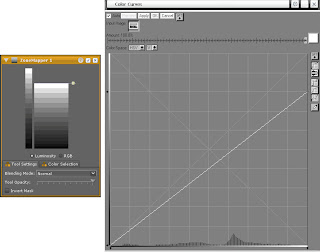 Darkening: Downward movements
The opposite of brightening: take a zone marker and move it down. Equivalent to curves below the central line.
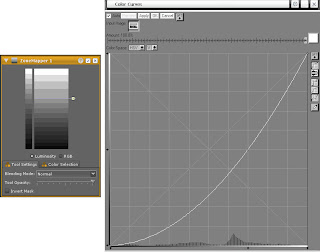 Taking a zone marker all the way to the bottom is equivalent to locking a curve to the bottom edge or lower input value in levels.
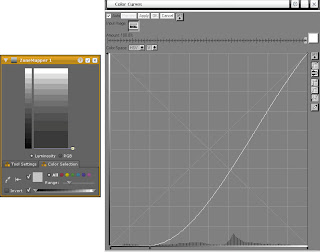 The black point
As with white point, the black point can be adjusted by moving the bottom zone marker up: left edge in curves or lower output value in levels.
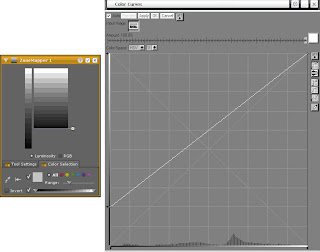
Contrast adjustments
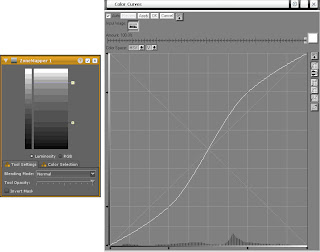 Moving them together reduces contrast.
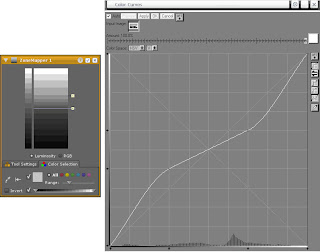 The big difference is that in ZoneMapper it is not possible to do whacky things like this:
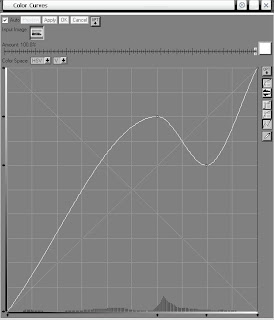 because the zone markers can never be overlapped.
Locking zones
One thing that s particularly good about the ZoneMapper is the ability to lock a zone boundary and only make adjustments on one side or the other (or both, independent of one another). Doing similar in curves takes a lot of adjustment points.
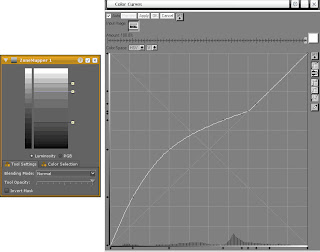 Colour masking (for version 3.x)
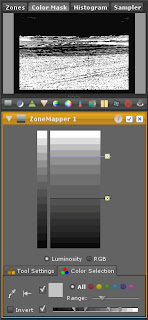
In the current versions of Lightzone there also exists the ability to mask each tool by colour/luminosity range. This is useful if e.g. you only want to do mid-tone adjustments with control on the definition of mid-tone. The 4 little arrows at the bottom show this in action. From the left the arrows are: dark feather limit, dark feather start, light feather start, light feather limit. Here I've shown the Colour Mask window which shows the mask in effect for the current tool. The 3 little RGB dots show there is a colour mask in effect for that tool (normally they're orange).
 A quick note on RGB versus Luminosity
There are 2 ways to employ the ZoneMapper - luminosity only or on RGB. The first is the normal way to use it, keeping RGB relations in tack. The RGB performs the adjustments on each channel separately. I can't remember ever needing RGB setting.
So there it is, I hope that proves useful.


This is definitely useful. I experimented with LightZone several months ago but ended up not purchasing it since I was happy enough with what I was getting at the time. I am often drawn back to it, though, not necessarily because I can't do many of those things in Photoshop but because the LightZone approach somehow seems more tuned to working with photographs.
ReplyDeleteThanks for the feedback. Lightzone is designed from the bottom up for photography so doesn't replace all the other uses for Photoshop in the graphics/design world.
ReplyDeleteI'll be putting together some more Lightzone "how to" posts in the future which you might also find interesting.
I to like the ZoneMapper UI, however, I may not purchase it because it does not fit well into my workflow with Lightroom and Photoshop. This is due to Lightzone not being able to move between Lightroom and Lightzone in the RAW format. And since I prefer to print from Lightroom, it discourages me from using Lightzone. Plus, Lightzone appears to have some issues with Page Setup settings. It doesn't remember the setting and so it reverts to the default paper size. Of course, I have no problems with any other apps. This could just be a bug and will be fixed soon.
ReplyDeleteOne last word, I think the Lightzone folks have a Lightroom plugin. I'll check that out.
Thanks for the well-written, informative tutorial.
ReplyDeleteAs a long time user of LightZone, I have already learned these in time. I guess, it would be nice to have a similar post on the differences in the use of the tool for darker vs brighter values. In my experience, we have less headroom for manipulation for the darker tones. This is natural if one knows the nature of the data but it is not apparent at the user interface level...
pathobach, I think care is always needed for the extremes of the tonal scale. I does depend on what adjustments you are looking to make but I would say, in general, other types of tools are better for extreme highlights or shadows.
ReplyDeleteIn terms of how much headroom there might be in shadows, I think that is much more a function of the image you are editing & the camera that made it: noise levels, tonal separation, recording/prcessing curve etc.
doonster, your primer proved to be very useful for an amateur like me, I really came to understand the nature of the ZoneMapper tool. I still need to do a lot of homework though :) As to LightZone, I find it pure FUN to use. So many filters to try, to say nothing of the countless number of their combinations. The biggest challenge will be to acquire the skills to choose the appropriate actions (or maybe NO actions!) depending on the specific photo. Hey, ísn't that what a hobby is for!!! Thanks again man.
ReplyDelete