I mentioned before that I have been developing a workflow that, in some instances, does not require output sharpening. I thought it might be of interest to go through the process to show what I've put together. This is particularly useful for all you ETTRers (Expose to the right), where the initial file can look very flat on-screen.
I realise there are specialist tools out there for sharpening. PixelGenius' PhotoKit Sharpener comes in for a lot of praise. Trouble with that plug-in is it is expensive and requires a full copy of Photoshop, also expensive (and which I'll not be buying any time soon).
Most of this work has been done in Lightzone, if you use curves in Photoshop or similar, read my primer on the ZoneMapper. ZoneMapper forms the core of this process, providing small but significant local contrast adjustments.
I'll step through a black and white image, as this happens to be the most readily to hand. I'll explain the differences for colour at the relevant points.
Initial conversion
This is straightforward: basic RAW conversion with your favourite settings. I tend to apply an exposure compensation such that the histogram just grazes the right edge. That may be either positive or negative adjustment (latter for highlight recovery). I'll also apply local white balance adjustments if there are several areas with different lighting.
Basic tonal range adjustment
First up I do an overall adjustment. Scenes compressed to the right usually have the dark areas pulled to the shadows. If there are dark shadows I use Lightzone's ToneMapper or Relight tools to compress the overall range (more on these techniques in another post).
Overall mid-tone & bright contrast
Once the image has the basics of tonal range and colour, I start working on more targeted contrast. first I expand the mid-tones and having a lot of sky in my shots (typical of grand scenic landscapes) I also look to expand the contrast in the brighter portions.
Micro-contrast sharpening
I use the Sharpen tool, but not in a way that I think of as sharpening. This is the "hiraloam" (High radium, Low Amount) technique. At this stage a first pass with settings (amount, radius, threshold) of about: 20-40, 20-25, 0. Later on I apply a second pass of 10-15, 50-75, 0.
Black and white conversion
Up to this point, I've got a pretty good colour image but even if the final output will be colour I'm now applying a black and white conversion to apply tonal corrections to specific areas. In that case I use a basic B&W tool.
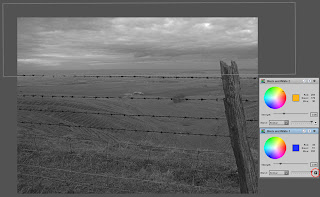
For a black and white output I'll convert different areas with different B&W passes. In Lightzone the black and white tool acts like a photo filter of given colour and intensity. this can be applied to achieve the desired effects. For me, I look to pick a filter that gives me the best tonal contrast for the area applied.
 Black and white conversion. The lower B&W tool is used for the lower part of the image - note the inverse button used on the highlighted region (circled in red).
Dealing with contrast in individual areas
This is really the heart of the adjustments that minimises sharpening requirements and gives the greatest impact to images. Each individual area of an image has a specific, but fairly light, contrast enhancement applied. An area is usually defined by clear boundaries or tonal/colour separations.
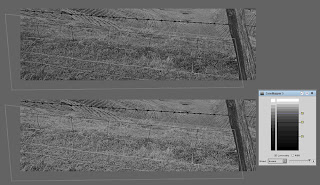
The technique I apply is this: add a ZoneMapper, define the region. Add a zone lock to the boundary 1 step above the lightest indicated in the ZoneFinder and another lock 1 step below the darkest. These 2 zone lock are then stretched to increase contrast in the given area. Usually the top goes to about the 3rd zone from lightest and the bottom to about the 5th or 6th zone from darkest. I'm looking for an effect that is noticeable but not overly so. If there are strange tonal effects & posterization, back-off. It probably takes longer to read the description than do.
I find that these adjustments help with both macro and micro contrast in the way Lightzone works. Fine detail is really brought forward.
 Example of local enhancement. Top is before and below the after, with the ZoneMapper used.
Once this is done, it's the point at which I apply the second hiraloam sharpening pass.
Reverting to colour
If the final output will be colour I disable the black and white tool and just check the opacities of the previous ZoneMapper adjustments to make sure they aren't too much, adjusting the opacity as required.
Final adjustment for output
First step is to convert the Lightzone file to a 16-bit TIFF, uncompressed. I can then work this into various output formats.
Output format is the one point where I do use Photoshop because Lightzone isn't really up to the job. For the web, I resize (normally with Genuine Fractals), switch to sRGB and maybe apply some sharpening (most of my recent output hasn't had any).
For printing I resize and then do a black point & mid-point adjustment using curves. This is to ensure I capture the range & brightness my printer gives. Black & white points are checked with a Threshold layer.
I would then apply any sharpening if required for the print. USM levels have come way down. In the past I may have applied as much as 150-250, 0.6-1.0, 5-10. Now its only a tweak, 75,0.5,5 might be typical. Images with a lot of fine detail or large expanse of solid colours will get sharpened with Picture Window Pro before opening in Photoshop.
When I printed this particular image, the unsharpened print looks like it came from film - very slight softness in some of the fine detail, especially around the top of the fence post. USM 75,0.6,5 was all that was required to sharpen all the detail right up.
Final result
And this is the outcome, adjusted for the web. Prints are now sharp but more subtle in the details and jump off the page.


No comments:
Post a Comment
I like comments, especially constructive ones.
Comments get emailed directly to me before publishing , so if you want to get in touch drop a comment.
All comments moderated by me before being published, keeps the spam at bay.